


/sLaNtEd gRoOvE/
Let's get down with some (odd?) grooves and drum recording tips!


Welcome back, friends!
Zach here, with your regular booster shot of drum gab, playlists, gear advice, recording help, transcriptions, and more! Following this issue, I will be doing a series of genre-specific issues that will dive into recording techniques, gear choices, interviews, essential tunes, and whatever else I can think of! If you have any suggestions for what you want to see, email me here: thedrumzine@gmail.com
Otherwise, if you haven’t already, subscribe here:
*Subscribe for free!*
Also, consider sharing this with your friends. I’d love to develop more of a conversation with new readers and drummers/non-drummers!
This week on “Let’s Give Zach ANOTHER Reason To Talk About Drums,” we’ll learn all about atypical grooves. What better way to document your grooves than learning about drum miking/recording? We also have Carlo Minchillo (founder of The Brooklyn Drum Collective) giving us some much needed advice on drum care. There’s a funky Vulfpeck transcription that’s guaranteed to give your kick/snare flow a run for its money. I’m also digging into a wobbly Jojo Mayer triplet kick pattern that will knock you off your throne (email me a recording of you playing either of these grooves and I’ll feature it in the next issue!). We’re gonna get (visually?) groovy with a Zach Danziger video. I also added in a fun exercise to help you construct your own lopsided grooves. And, as always, stick around till the end for this week’s Spotify playlist full of more asymmetrical grooves!
If, after reading, you find that you need more slanted grooves in your life, check out these drummers on Instagram:
Now, let’s get groovy…
Drum Recording
Miking a drum kit can be as simple or complex as you want to make it. It all comes down to the sound you are looking for and, in part, your budget. You don’t need top-of-the-line gear to get a good sound. One of the most important aspects of this process is knowing what mics (and placement) will help you reach your sound. If you don’t know, you’re in the right place!
I’m going to go over some basic mic placements, standard mic options, as well as some less common options just for fun. All of these tips are to give you a solid base, so you can experiment and create your own tricks/techniques/styles. So, on we go: ah 1, ah 2, ah 1 2 3 4! (I’m going to be making a lot of corny drum jokes in following issues, so you might as well just get used to it now.)
KICK DRUM
PLACEMENT: Inside, Outside, Both
INSIDE: This is where that punchy kick sound comes from. You will get the most definition here.
OUTSIDE: Here, you’ll start hearing a bit more depth and resonance, especially if the batter head doesn’t have a port-hole cut into it.
BOTH: Get the punch and the resonance of the drum by mixing both mics together! You can play around with the distance of the outer mic to get differing resonant sounds.
MIC EXAMPLES: Shure Beta 52A, AKG D112
SNARE
PLACEMENT: Side of snare (just above the rim), pointing at the center of the drum. A second mic can be placed below the snare (in the same fashion as the top mic) to pick up more snare wire buzz.
MIC EXAMPLES: Shure SM57 (industry standard)
OVERHEADS
PLACEMENT: If you have two mics, one common method is to place them above the kit in an XY pattern. This means placing them diagonally, so they form an “X” shape (90 degree angle from each other. Why it’s not just called an X pattern is beyond me…) Keeping this orientation, you can space them apart to get a more stereo image of the kit. You can also place them both facing the ground when spaced apart (referred to as “matched pair”).
MIC EXAMPLES: Ribbon and condenser mics are both popular overhead options. Ribbon mics have a figure-8 polarity (for more about mic polarity, click here), so if you are recording in a room with higher ceilings, you can use this type of mic to get more ambience from the room. If your ceilings are low, or the room tone is poor, consider using a condenser mic to pick up just the tone of the kit. Or, if you’re recording with a live band, you could use a hypercardioid mic. This will give you an even more narrow pickup pattern.
MIKING TECHNIQUES
1 MIC: Experiment placing the mic just in front of the drum kit (~2’-10’ away. The further away you go, you will gain ambience but lose definition), or next to the drummer’s head (to get a more “accurate” picture). Just make sure it isn’t in head-bang territory!
2 MICS: You can try a spaced XY or matched pair setup for a nice stereo image. You can also experiment placing one mic close up and one further away from the kit. Examples of this include a kick & overhead, front of kit (~2’ away) and a snare, or next to the drummer’s head and a kick. Experiment based on the sound you are looking for.
3 MICS: Try using a kick mic, snare mic, and an overhead. This will ensure you get a more definition from the toms and cymbals. Experiment with the placement of that third mic to see what fits best for the music you are recording.
GLYN JOHNS TECHNIQUE (w/ FOUR MICS): This placement technique was popularized by its use on records by The Rolling Stones, The Who, and Led Zeppelin. The basic purpose of this technique is to capture an accurate stereo image with a defined kick and snare sound.
1) Place an overhead mic about 4’ above the center of the kit and face it straight down.
2) Place a second overhead mic on the far edge of the floor tom (horizontally). Point it towards the hihat. This mic should be raised ~6” above the rim of the tom.
3) Mic the snare and kick to preference.
4) To make this technique work, you’ll need to pan the overhead channels left and right, respectively, in order to capture the stereo image.
*To use this technique with only 3 mics, just remove the snare drum mic*
To see Glyn Johns explain this technique himself, click here
For those of you that have some flexibility in your budget, consider the Yamaha EAD-10. It fastens right to your bass drum and works as a bass drum trigger and mic all-in-one. It does a wonderful job capturing the entire kit. The audio is sent to a drum module with an array of built in effects including reverb, flanger, overdrive, distortion, delay, and a lot more. If you’re thinking about posting drum videos online, this mic is a great option. I have one and I absolutely love it. It is currently priced at $500.
(I’m not affiliated with Yamaha, I just really like this mic.)
*for more on minimal miking techniques, check out this article by DRUM! Magazine*
KEEP IN MIND: A poorly maintained drum kit can only get you so far. To get a nice sound in your recordings, proper upkeep is necessary. Are we segueing? I think we’re segueing…
DO YOU EVEN CARE FOR YOUR DRUMS, BRO?
by: Carlo Minchillo (@carlo_in_space, @brooklyndrumcollective)
Drums are tough. If your rehearsal space drum kit or the backline of your favorite local venue could tell a story, it would speak of being tossed around the room, thrown into closets and vans, and rarely seeing the inside of a gig bag. But as tough and resilient as they are, drums get dusty, they get rusty and they sure have it rough in the world of music. Which is why proper maintenance and care is essential to a long and healthy lifespan of your percussive instrument.
This prized possession is usually made of wood, metal (or metal components) that are considerably durable and strong. But when exposed to the elements, a damp rehearsal space, or an extremely hot room, they can begin to oxidize, rust and warp. The pitting on the shell of a Ludwig Supraphonic, the rust build-up on tension rods, or the peeling of drum wraps are usually the result of poor maintenance and harmful environments.
One of the first steps you can take to prevent damage to your drums (and cymbals!) is to purchase a case. Whether you acquire a soft or hard case, you’ll greatly reduce the risk of moisture ruining that beautiful maple, birch or steel shell. Now if you’re gigging, you will undoubtedly have one for your snare drum because it will probably see the most travel compared to the rest of your drum kit. But if you’re just starting to get into the drum case game, I recommend the Ahead Armor soft cases and the Humes & Berg Enduro hard cases. Keep in mind that the hard cases will weigh more, but they’re strong and super easy to load drums in and out of. (Quick setup guide coming soon!)
As for the mechanical parts of your drums, one of the biggest improvements you can make is by using a better lubricant for your tension rods. 3-in-1 mineral oil will make sure that the tension rods move nice and smoothly when tightening a drumhead. When the Brooklyn Drum Collective set out to fix the drum sets at various underground venues in Brooklyn, we used this option because it lubricates as well as cleans and prevents corrosion. Recently, technician Zack Garnett (IG @zack.garnett) from the back-lining company CenterStaging NYC recommended white lithium grease. This grease is designed to eliminate metal-to-metal friction and resist moisture that can lead to rust. It also resists high temperatures and won’t melt or run from the threaded inserts. So the next time you change your drumhead, use the right lubricate and keep your drums working and looking like new.
For more guidance on drum set maintenance, contact the Brooklyn Drum Collective at brooklyndrumcollective@gmail.com
Carlo Minchillo
Founder and Director of the Brooklyn Drum Collective
www.brooklyndrumcollective.com
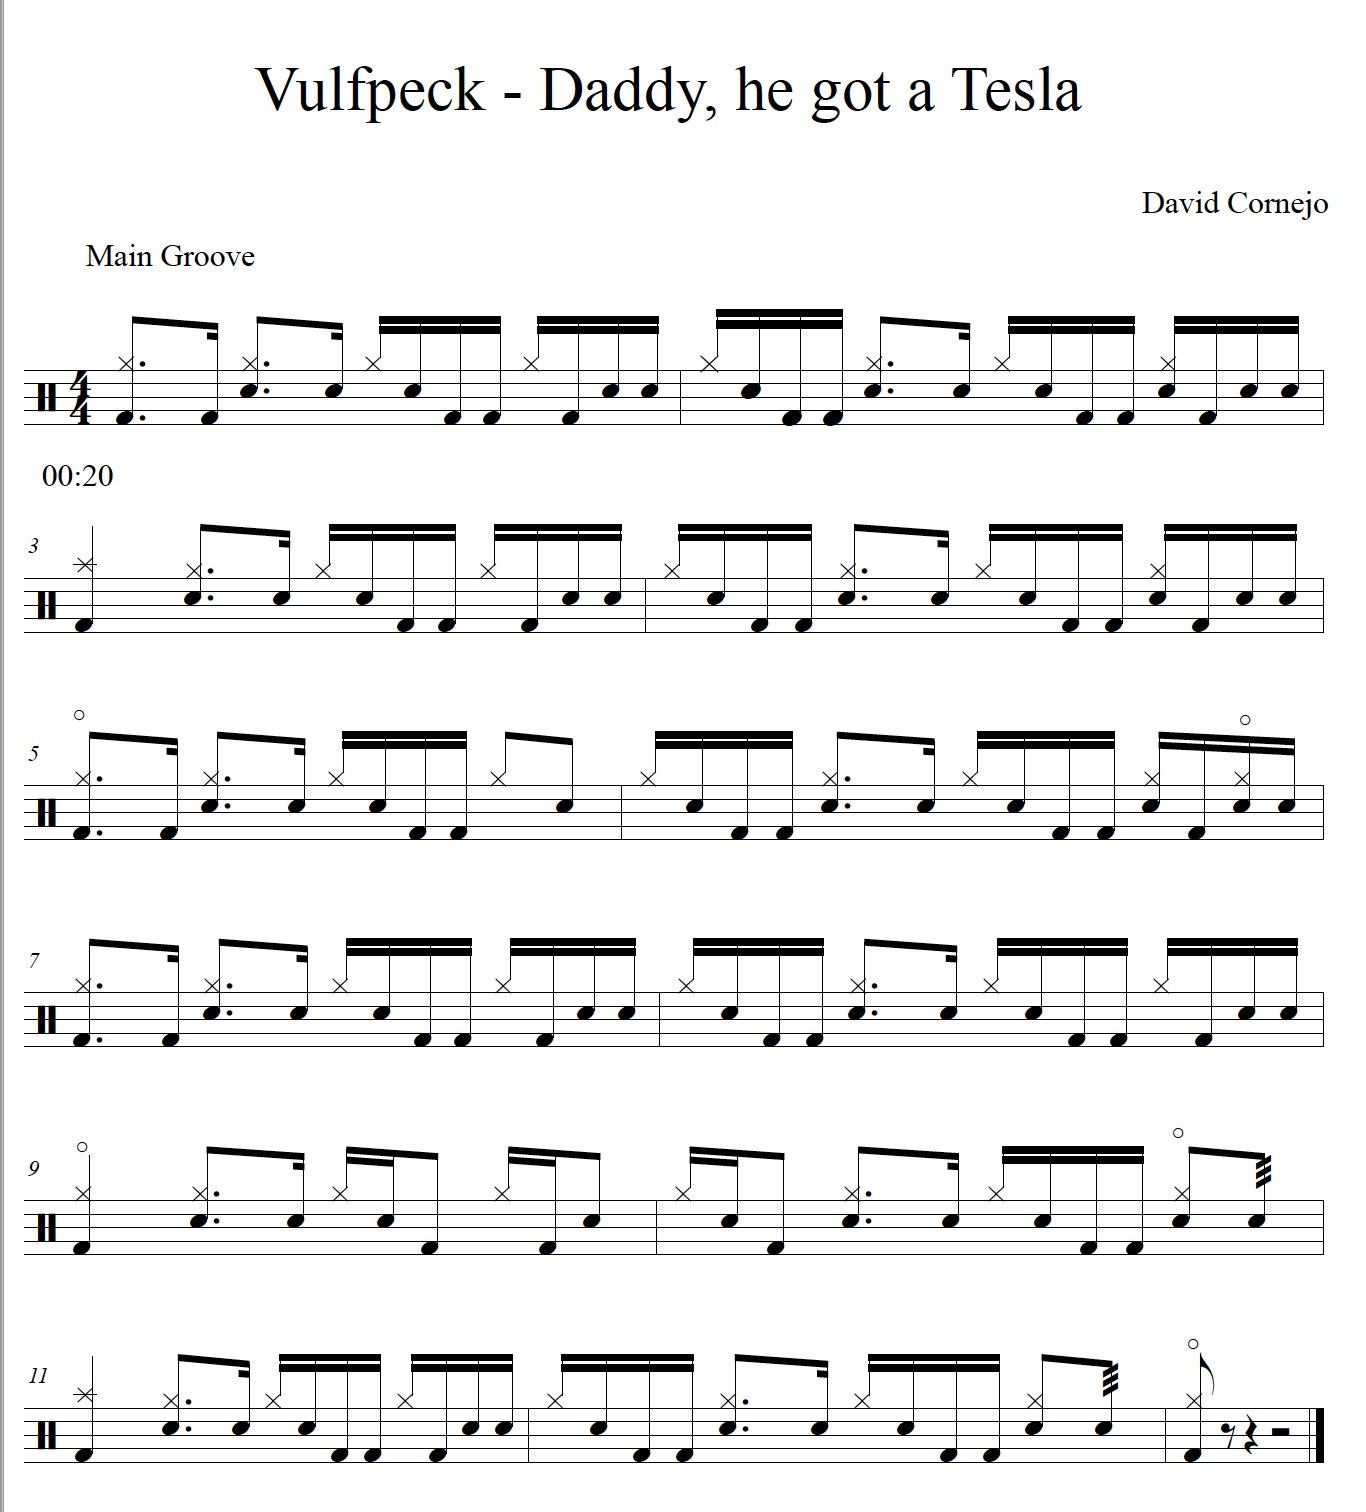
TRANSCRIPTION
This week’s drum transcription is brought to you by David Cornejo-Allegre (@davidcornejomusic). This driving groove will keep your snare hand and kick satiated for a while. The target tempo is ~120 bpm. I suggest a listen to this whole album if you haven’t heard it before. For your grooving pleasure, this song is on this week’s Spotify playlist (which is located at the end of this article).
GROOVE BREAKDOWN
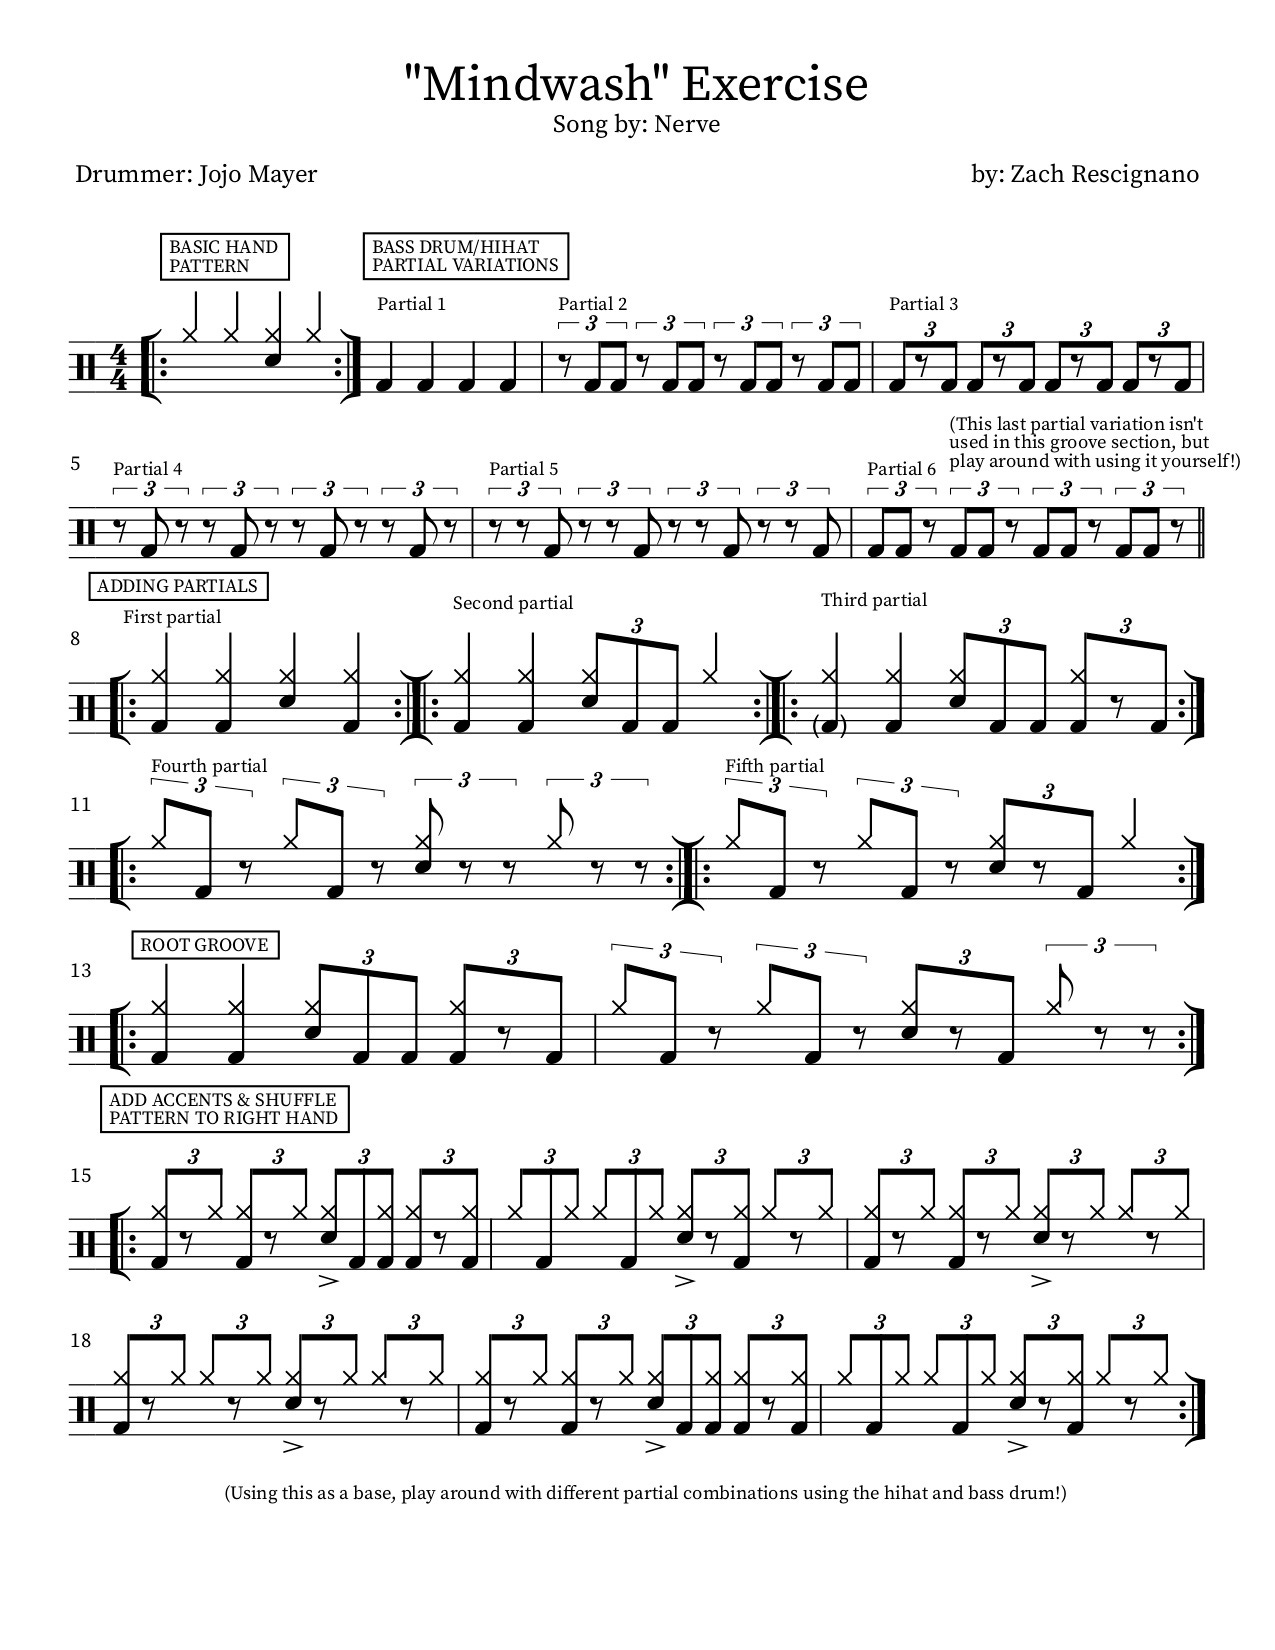
Anyone who knows me knows how much of a Jojo Mayer fan I am. Jojo is a Swiss drummer based out of NYC. He and his band Nerve have been pioneers of the drum n’ bass genre for years now, with no signs of slowing down. Jojo is a master of time and groove (no seriously. He did a TED talk titled “The Distance Between 0 and 1.” Watch it here for mind-melting pleasure). Just one listen will leave you stunned and grasping for more. This is why I’ve chosen to go in deep with a groove from one of my favorite Nerve songs, called “Mindwash.”
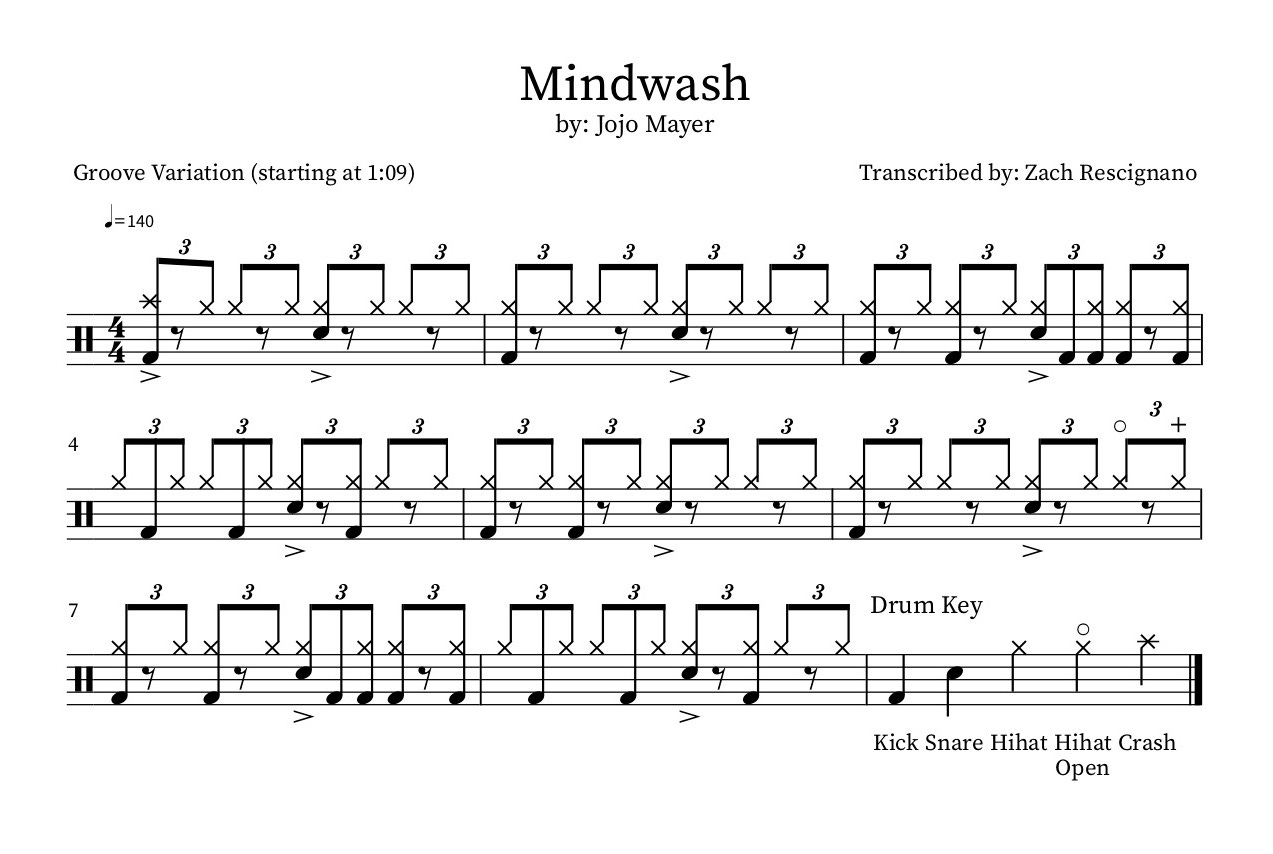
This skewed triplet-based groove is a variation on the classic halftime shuffle. The third partial, on the hihat (the “let”), is played as a ghost note. It should be felt rather than heard.
It starts simple enough but, on bar 3, Jojo plays a kick pattern that seems to come out of nowhere, just like sputtering tire on a highway. By playing around with different partials of the triplet, he is able to bring new life to a standard concept.
Lets play around some more…

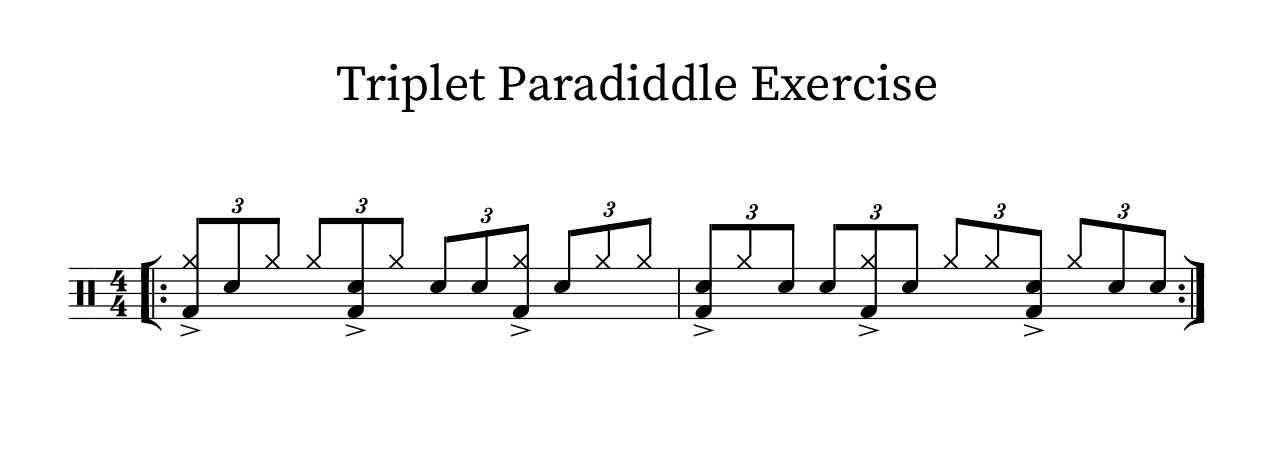
OFF-BEAT TRIPLET PARADIDDLE EXERCISE
Here’s an easy way to make your grooves sound tilted: Play around with different paradiddles/accent patterns on top of a triplet grid. For a more in depth breakdown of this idea, check out the drum book Future Sounds, by David Garibaldi.

VISUALLY GROOVING W/ ZACH DANZIGER
Zach Danziger is another NYC based drummer, well known for his creative use of electronics to trigger not only audio samples, but video as well. His drum rig allows him to have full control of audio and visual components as he improvises with his fellow bandmate Owen Biddle (the duo known as “Edit Bunker”). By “full control,” I mean FULL CONTROL. On top of being able to trigger the video’s FX, speed, and loops, he is able to improvise off the chord structure (by playing single notes or whole chords) that Biddle plays on bass. There is a Modern Drummer interview (March 2018 Issue) in which he describes just how he and Owen are able to pull off these amazing feats.
Zachs ARE pretty cool, huh?
LIVE STREAMS
11/7 Shadow Monster on bandNada @9pm
WE HAVE A NEW RELEASE!
Brooklyn Drum Collective Presents... Live at Our Wicked Lady [Bandcamp link]
CODA
That’s it for this week, thanks for hanging out! If you’re interested in being featured in an upcoming issue, email me here. If you want to see a specific song transcribed, or if you have any questions, send me an email and I’ll be happy to work with you.
Stay weird friends, I’ll see you soon!
Zach Rescignano